
This article is an addition to the 2‑part How to Cure Vanilla Beans article.
A critical stage in the curing of vanilla is the “sweat,” where the enzymatic process that develops the vanillin takes place. The sweat box creates an environment that holds the beans at the optimal temperature for this process.
In the How to Cure Vanilla Beans article, I describe how to put together an ad hoc sweat box using a cooler and hot water bottles. In this article, I will describe how I built the electrically heated sweat box used to handle larger quantities of vanilla pods.
Not Just for Vanilla
For the fermentation do-it-yourselfer, a box like this has many uses. Basically, what this is is an incubator. You can set it up to hold any temperature above ambient, so any process that requires a constant warm temperature is something this box will be useful for.
In our house, this box gets used a lot for fermenting cacao. We have a few cacao trees, so we’re often fermenting small batches of beans for our own use. You could also use this box for making tempeh or yogurt.
A Brief Disclaimer
I am not a licensed electrician, the build instructions I provide here are offered on an at-your-own-risk basis if you decide to follow them. I’ve been using a box of this design, with the same electronics I describe for 4 years with no problems. My experience is that this is a safe design. Be aware of the risks of electrical shock and fire that are always present with a project like this.
This is a very detailed article, there’s a lot of instructions to follow. I strongly urge you to read it over first so you understand what you’re possibly getting yourself in to. There are a number of things in the project that can be or need to be improvised, so going over the article will help you get some ideas for what might work using stuff you may have just lying around.
Stuff You’ll Need to Get Started
The sweat box has 3 main components: the box itself, a rack for holding the beans, and the thermostatically-controlled heater.
The Box
For the box, I used a 50-quart Igloo MaxCold cooler. This cooler is the perfect size, and it’s well insulated. That will run you about $60 new, but I just used an old one I had sitting around. A trip to the thrift store is probably a good way to get a cheap one.
The internal dimensions are about 20″ x 10″ x 11″ deep, in case you’re looking for a similar-sized substitute. It’s no big deal to make a smaller one, we had a 25-quart one for a while at first.
The Rack

The purpose of what I am calling the rack is to hold the beans away from the heating elements and allow air to circulate around the beans. The heating elements are hot enough (about 200℉) to burn if touched or melt plastic bags, so you will want to make sure there is some kind of barrier between the heater and the stuff you’re keeping warm.
Air circulation helps the whole setup be more efficient and prevents cold pockets.
I don’t go into a lot of detail on how I built the rack, it’s made out of stock aluminum of the kind easily found in a hardware store. It’s fastened together with pop rivets. I don’t really expect you to go to this much trouble…you can, with some imagination, come up with a ready-made alternative. A plastic rectangular storage basket that you can find in a hardware store, for example.
Anything that fits into the box and keeps the beans away from the heating element while allowing air circulation will work fine. The size you’re looking for is about 15″ x 9 1/2″ x 10″ deep or smaller.
The Heater
This is undoubtedly the most complex part of the whole thing, and maybe a little daunting for those who haven’t worked with electronics before, but I’ll try to make it clear how it all goes together.
These are the parts you’ll need to build the heater (these link to a product page so you can see exactly what it is and possibly where to get it):
- Digital PID Temperature Controller
- 2 — 250 Watt Ceramic Heating Elements
- K‑Type Thermocouple Temperature Sensor
- 25 Amp Solid-State Relay
- 2- or 3‑prong 10′ Outdoor Extension Cord
- 6′ Extension Cord
- 6 Orange Wire Nuts
- Plastic Food Container
- Some popsicle sticks or tongue depressors.
- 8″ Zip Ties
- Aluminum Repair Tape
The extension cords can be salvaged from broken/unused electrical items: this is what I have done. The popsicle sticks/tongue depressors are to provide a thin insulator for mounting things that might get warm.
For tools, you’ll need a sharp utility knife, wire cutter and wire stripper, and a power drill with 3/8″ and 1/8″ bits.
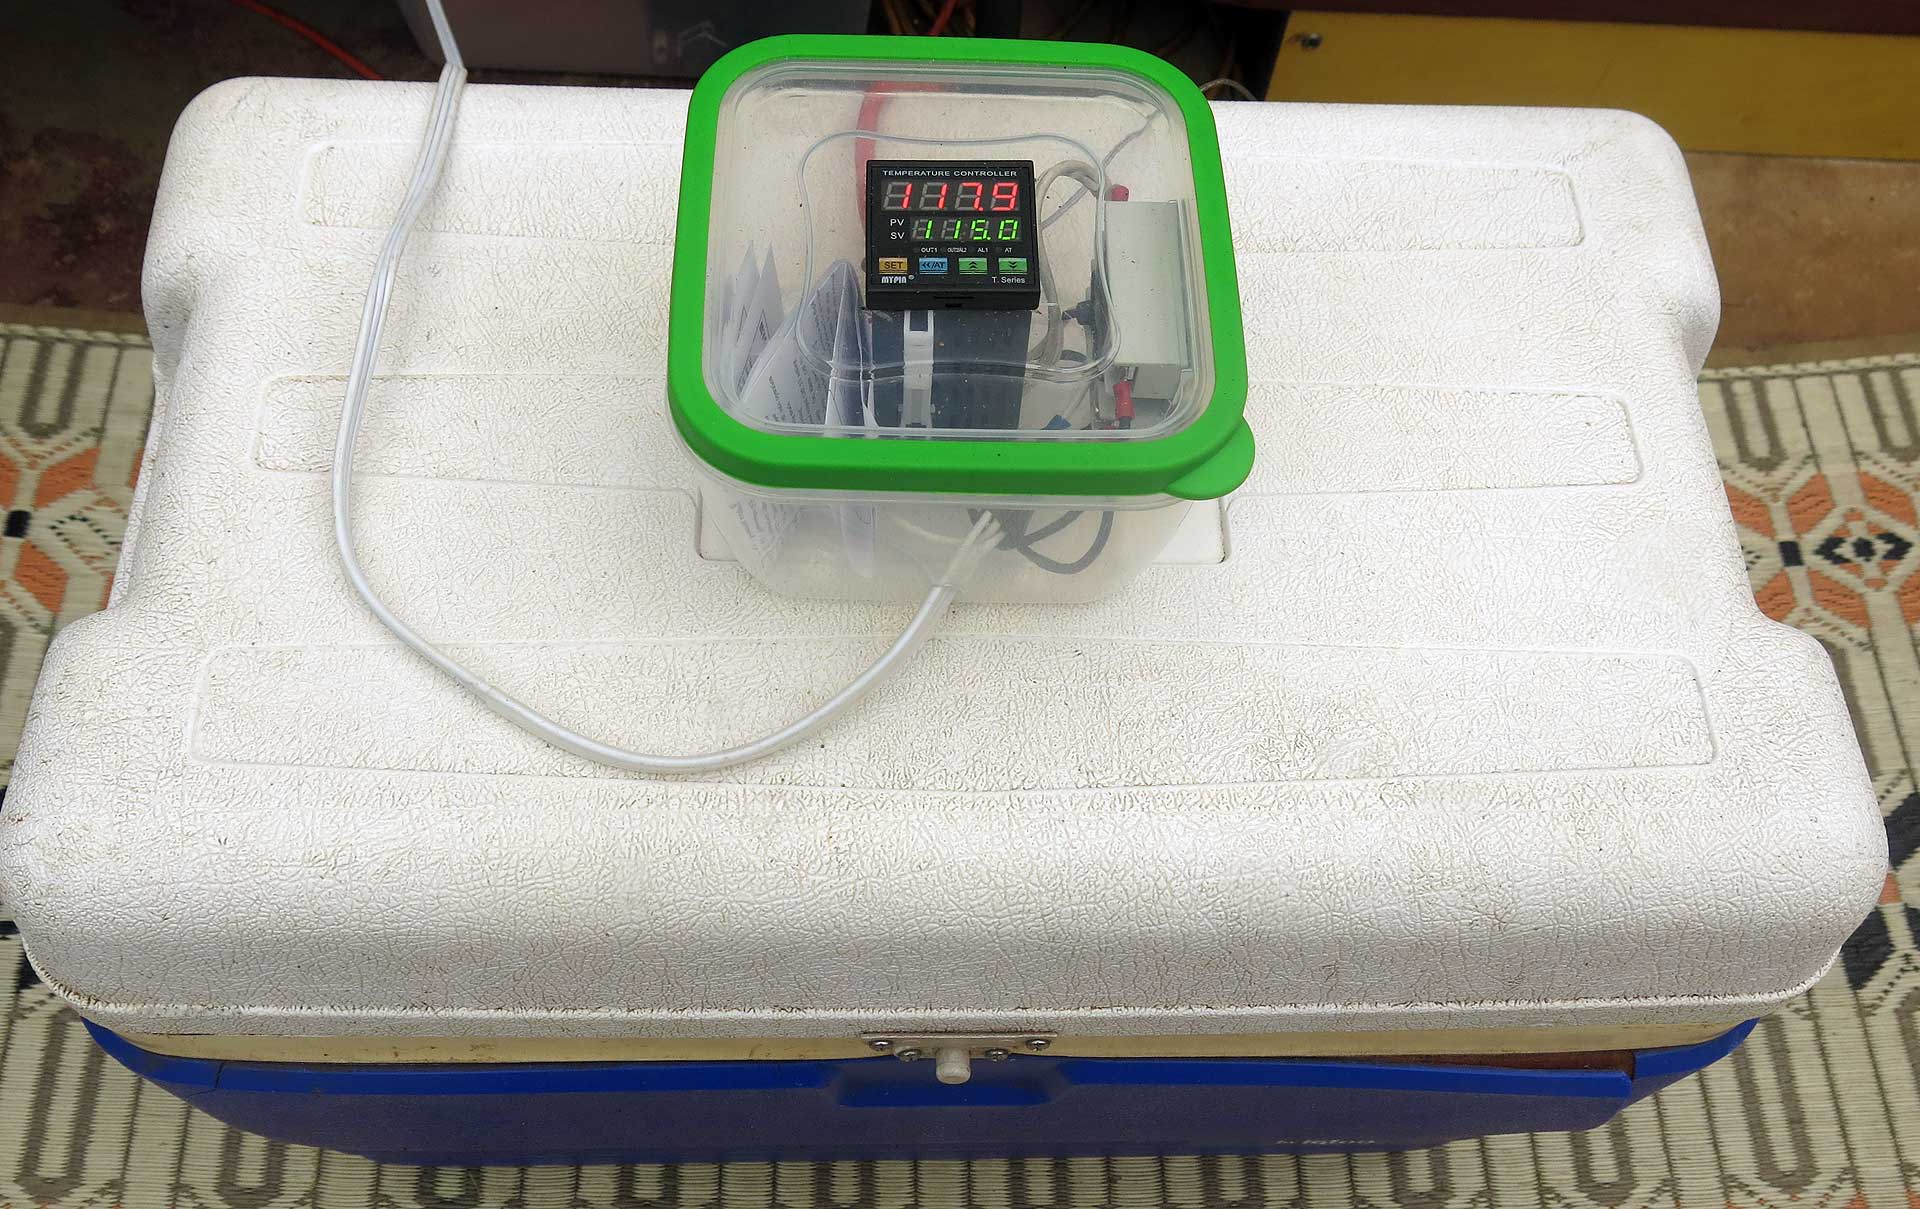
The Container

The plastic food container is going to be our electronic project box. The container needs to have internal dimensions of at least 5″ x 5″ x 4″ deep. The kind I like have snap-on sides to the lid, but any one with a secure top will do. Don’t try to use a “disposable” one, you need the heavier weight ones.
What we’re going to do first is drill a hole on one side of the container, and 2 on the opposite side. These will be for the power cord, the heater cable, and the temperature probe. On the 3rd side, we need to drill 2 1/8″ holes, 2″ apart for mounting the relay.

On the lid of the container, we’re going to cut a 1 3/4″ x 1 3/4″ square hole for the controller. Use the bottom of the controller module to draw the square on the lid with a sharpie and then cut it out with the utility knife. Use light pressure with multiple passes to safely and accurately cut through the plastic. Be sure to cut on the inside of the line you drew, you don’t want the hole too big! A metal straight edge is not a bad idea here.
Unbox the controller unit and insert it into the square hole so the face is on the outside. There are two plastic spring clips to hold it in place.
Wiring it Up
OK, you have your container drilled and the controller unit is mounted into the lid. Next, we wire it up. This first diagram gives you a big-picture view of how the whole thing is wired up, so you know where all this is going.
Wiring the Control Box
Start by cutting an 12″ piece of wire off the 6′ extension cord. Cut the receptacle end off, you won’t be using it.
In the wiring diagram (brown wire), this is the wire that connects the controller to the control inputs on the relay. Split and strip the ends and consulting the circuit diagram to see which terminals to use, connect the controller to the relay.
Now thread the thermocouple temperature probe wire through it’s hole in the side of the container. Connect the probe to the controller according to the circuit diagram below.
Wiring in the Heater Power
To wire in the power, take the 10′ outdoor extension cord and cut it so that the plug (male) end has 7′ of cord (for the power cord) and the receptacle (female) end has the remaining 3′ of cord…this is your heater cord.
Using the utility knife, carefully strip off about 10″ of the outer sheath of the end of each cord to expose the wires inside. Avoid cutting into the wires when stripping off the outer sheath. How I do this is I set the utility blade to just barely protrude from the handle, then make a cut along the length of the sheath, cutting just deep enough to go through it. Peel it back and cut it off.
Take the heater cord and cut about 6″ off of both wires, leaving 4″ of wire on the cord. This will give you the 2 wires you need to connect the power to the controller unit.
Thread the power cord and the heater cord through their respective holes in the container. Use the wire stripper to strip 1/2″ of insulation off all the wires you just exposed, then use the wiring diagram and circuit diagram to connect everything together. When inserting wires into the terminals, take care to get all the wire strands into the terminal. Use the wire nuts to connect the power to the controller unit as shown in the wiring diagram. Pull on all the wires you just connected to make sure they are not going to come out. Note: the power connections to the relay switch are not polarized, so it doesn’t matter which terminals you use.
Once you’ve got it wired, double-check all the connections against the circuit diagram.
Using zip ties, anchor the 3 cords that go through holes in the container: double-wrap and cinch a zip tie around the cord on the inside of the container right where it goes through the hole. This is to keep something pulling on the cord on the outside from pulling on anything on the inside. The zip tie should prevent the cord from pulling out.
The Circuit Diagram
Mounting the Relay
The relay is mounted to the side of the container. The popsicle sticks (or tongue depressors) are used to provide an insulating pad between the relay’s metal bottom and the side of the container.
The relay will build up some warmth, but not a lot, certainly not enough to ignite wood. The wood keeps the plastic from possibly melting.
Cut the wood down to the width of the relay. Place the wood on the side of the container, between the holes, then put the relay on top of that, lining up the holes. If the wood covers the holes, drill through the wood so the zip tie can go through the wood too.
Use the zip tie to go though the holes in the relay and the side of the container to anchor the relay in place with the wood sandwiched between the relay and the side of the container. You can see how it’s mounted in the photo below.

Finishing the Control Box
Now put the box together, arranging the wires so that everything has some room in there. The wires should be loose, but if you can’t tame them, you can use some tape to hold them so they’re out of the way. Do it so that there is still enough slack in the wires so you can still open and close the box. You’ll be glad you did that later. I like to put the little instruction booklet for the controller unit in there to so that I can find it later when I’ve forgotten how to program it.
Setting Up the Sweat Box
Now we’re going to set up the wiring in the sweat box itself.
You’ll need 4 wire nuts and the rest of the 6′ extension cord for this. The cord will have more than enough length to connect the heating elements and then make it out to the control box.If it seems like too much, you can cut it down.
First, you’ll need to remove the drain plug from the cooler. On the inside, there will be a big plastic nut. Loosen and remove that nut: you’ll probably need a medium sized pair of slip-jaw pliers to loosen it at first. Once the nut is off, hit the remaining part of the drain plug that is still protruding into the inside of the cooler with something like a hammer to pop it out. It’s just held in place with a rubber gasket, there’s no glue or anything like that.
Now run the cut end of the extension cord through the drain hole into the box so the plug end is on the outside. Also thread the sensor end of the temperature probe into the cooler.
Use the aluminum repair tape to tape the temperature probe to the inside wall of the cooler above and to one side of the drain hole. It should be about midway up the side. The idea is that the heater element will be on the other side so the probe is not directly above the heater element.
Wiring in the Heating Elements
Connect the heating elements according to the diagram below. You will need to make a tricky little cut into the extension cord about 2′ from the end: cut only one of the two wires, then tear them apart, giving you two 3″ wires on one side, with the other side uncut. This gives you a way to splice a heater element into the cord.
About the Heater Element Wiring
This is a side note about supplying power to the heating elements. In this circuit, the two heating elements are wired in series. If you look at similar circuits, you’ll often find the heating elements are wired in parallel. The key difference between the two is the voltage that the elements will get.
If the elements are wired in parallel, each will get the full line voltage. If you wire in series (you’d only do this with two identical elements!) the voltage will drop by half, so in this circuit, each heater will get half the voltage, or about 55 volts.
The reason we’re doing this is these heating elements will get up to 300℉ or more at full voltage. We don’t need that high a temperature, so for safety, we’re running the elements at a lower voltage. At that voltage, the elements will only get to about 200℉, which is pretty safe as far as a contact burn or fire hazard is concerned.
The downside is that if in the unlikely event one of the elements blows its fuse (these elements have a safety fuse), the other one will stop getting power. It’s a good idea to check on the box daily (you’ll be doing this anyway to cycle the beans through the dehydrator) and make sure it stays warm.
Attaching the Sweat Box Components
Once you have all the electrical parts wired up, they need to be mounted so they don’t move around inside the box. In my setup, the heating elements are attached to the rack I built, but you probably won’t be doing that.
A reasonable and easy alternative is to use 2″ metal “L” brackets of the kind found in a hardware store. Use zip ties to attach a pair of brackets to each of the heater elements so that they can be attached to the side of the box as though they were sitting on a shelf. Use the aluminum repair tape to tape the brackets to the wall of the cooler. This is secure enough if they don’t get bumped a lot. You could use screws they give you with the bracket if you wanted to make them more secure.

Now that the heaters are both affixed into place, use strips of the aluminum repair tape to tack the wires along the bottom/side corner of the box to keep them out of the way.
On the outside of the box, where the heater cord and temperature sensor cable come out, tape the hole up with aluminum tape. This will keep the wires from moving around and seal the box up so bugs won’t crawl in there.
Setting It Up, Turning It On
Now, you’re ready to go. The heater cord from the cooler should be plugged into the heater plug on the control box. Check the wiring again to make sure it’s correct, then plugin the control box in.
The temperature controller will go through a test cycle and then settle down. There are a lot of settings with this device, but for the most part, you can leave it as it is with the factory settings. The instructions booklet is written in broken English, but it can be followed. One of the settings you may want to change is the C/F setting depending on the units you’re comfortable with.
Setting the temperature is pretty easy, just press the blue AT button and one of the green numbers will flash. Use the AT button to select a digit, and the green up/down buttons to set the temperature. For sweating, we use 115℉.
Once you have the green number set to your target temperature, press the yellow “set” button to accept the change. The red “out1” light should come on, meaning the relay is energized. There should be a red light on the relay indicating it is allowing current to flow to the heaters. You should feel some warmth coming from the heater elements if you put your hand over one.
The top red numbers tell the current temperature reading from the probe.
These temperature controller modules (commonly known as a PID controller) can be a bit temperamental, but I won’t go into too much detail here. These units are widely used by hobbyist home brewers, so there is a lot of help out there if you do some internet searching using “TA4 PID” in your search terms. That’s what I do if things are not working as they should.
Have fun building this! If you’ve got questions, use the comment form below.
This is awesome Roland, thank you for the excellent detailed instructions. Will start gathering the parts and hopefully have a sweat box for the next bean harvest. I’ll let you know how it goes.
Great, Anna! We look forward to hearing about it.
Thank you. One alternate suggestion to heater. Use an incandescent bulb/s of higher wattage. Safer. In addition, you can connect a small FAN (take from PC UPS) for circulation to give uniform temperature.
I had earlier build a similar setup to test electronic circuits at elevated temperatures.
Thanks very much for your comments! My original sweat box used a light bulb as a heat source, the ceramic heaters are more compact and I think safer since the surface temperature is lower than a light bulb and it is easier to avoid anything touching them. The fan is a nice touch, but I have not found that to be necessary.
Great tutorial, Roland, thank you. Your other tutorials on how to process the beans helped us to successfully sweat and dry our small amount of beans. They are conditioning together now.
Our vanilla vine started blossoming last week and we have been pollinating 1–3 flowers a day. With an expected much higher rate of successful pollination this year, your sweat box tutorial is perfect. Thanks again for taking the time providing these tutorials.
Just curious as to what is a good successful pollination ratio?
For me, last year was pathetic. This year is better (about 40%)
You should be able to get to 80%, that is what we’re averaging here. Some things we have learned:
Thanks, I’m happy to share what I’ve learned with other vanilla growers!
Thanks for this. I was thinking of doing a sweat box like yours before i saw your site. Never got there, just used smaller coolers. Another heating idea is a Radiant Heat Panel, they use them for reptiles with thermostats.. I live on the west side and my orchids just starting flowering 2 days ago. I only have a few vines but ended up with 35 beans last year and 29 to finish. I have all B quality, I’m to impatient. Haha I cant wait to read your other articles.
Thanks, good tip on the radiant heat panel, I’ll take a look at that.
Had a similar experience where beans fell off vine within 2 months of pollinating last year. This year, I pollinated all flowers on the raceme, and only a few fell off so far (3months). I think the failing, falling beans are based upon the maturity of the vine, and the numbers of flowers pollinated. I believe the plant cannot feed ALL of the beans if relatively young. How many flowers on the raceme should be pollinated?
This is a really good question and I have to explain this to people who are helping with the pollination here. The first thing I explain is how to tell if a flower was successfully pollinated, which you can tell on the next day. Then we go with a rule of 5–7 beans per raceme. Once it has reached that number, we stop pollinating it. You can tell from the size of the beans that are already forming how strong the raceme is, and a strong raceme can support more beans.
A related discussion happens around the position of the flower on the raceme, which affects the shape of the finished bean. Since we are not pollinating all of them, we try to choose to pollinate a flower that is a favorable position for bean formation.
We’ve had a lot of experience with over-pollinating here, but I’ve never seen the vine drop beans. We just end up with a lot of tiny beans. I will often break off pollinated flowers or small beans if I think the raceme is full and the beans won’t get big enough.
So, I’m not really sure about the cause of the dropped beans, we’re not really seeing that here. One thing you may want to check for is the condition of the vine itself. For example, if the feeder roots are damaged, the vine may not be able to support bean formation. If you’re growing in pots, it’s a good idea to make sure the feeder roots are in the mulch where they can absorb moisture.
Roland, no need to do the research on the reptile heat pad for terrariums. They do not provide the amount of heat needed (104 degrees max), and will never heat a cooler the way your sweat box will to the required 115 degrees. I live in south Florida (Keys-zone 11). Perfect temperature, humidity, and rain/ dry spell to successfully grow v.planifolia.
Zone 11 is perfect. Good luck with your vanilla growing, and I appreciate your questions!
I am Gerald O’Nneil from Papua New Guinea.My people plant alot of vanilla and I am happy to read some of your comments.
We don’t have buyers of our vanilla and don’t know if you can help get some buyers for us
Thanks
Gerald
Hi Gerald,
Thank you for contacting us! Several months ago, I was contacted through this forum by a grower in Papua New Guinea. They were also looking for ways to sell their vanilla, and I tried to help, but I got nowhere. I just don’t have the right contacts. I found one distributor there Intec Vanilla Niugini Limited, they can be contacted by email at [email protected]. They look very professional, but I don’t know much about them.
Good Luck, I wish I had more to offer.
Hi Gerald
I am in England and we buy Vanilla feel free to contact me to discuss sale/purchase of your vanilla if you would like.
you can contact me on [email protected] to start with.
best wishes
Simon
Hi Roland !
We are just starting to plant vanilla here in Sabah (North Borneo), Malaysia. Your article has been a wonderful source for us, especially the post harvest curing methods.
I am wondering if we can use temperature controlled food display warmer as sweat box, as the temperature inside would be better controlled. Or maybe we should just use a temperature controlled dehydrator with fan on.
Your thought would be a great help.
Thanks & cheers.
Hi Mokhtar,
Always good to hear from another vanilla grower!
For the sweat box, as long as it will hold the right temperature, your food display will work fine. The dehydrator won’t work (I know this from experience) because the fan will dry the beans too quickly, even though they are in plastic bags. The sweat box must be moist and warm, so that the beans retain moisture during the sweating process.
Good luck with your project!
Thanks very much for your reply Roland..
Hope to keep in touch.
Cheers !
Hi, Roland!
Thanks for sharing all your knowledge with us.
Do you know about any kind of equipment that can be used to mesure the level of the bean moisture? Something specific or that can be used as that? I’m having a really hard time knowing when is the time to move between curing fases since I’m dealing with Pompona here in Brazil.
Cheers!
Hi Gustavo,
I know it can be tricky, but here is the method I use and it will apply to you as well. First, you need to know the moisture content of a green pod. For planifolia, it is 80%, it’s probably the same for pompona. This will be hard to find because pompona is not well studied scientifically.
So, if you know the weight of a pod when it is green, and you know the moisture content, then you can always calculate the moisture content based on the weight of the pod. Take several green pods, label them so you know which is which, then weigh them, making a note of the weight for each one. Now, as they dry, you weigh them and when they get to the right moisture content, you will know what that feels like. After that, you can do it by feel. This is how vanilla curers do it, it’s by experience.
Here is how to calculate the moisture content of a pod:
Green pod moisture level is 80% (you know this from published values)
If your green pod is 10g, you know that the dry weight is 2g and the water weight is 8g.
As the bean dries, only the water weight will change.
So, your 10g green bean dried to 30% will weigh 3g. 3g — 2g (dry weight) = 1g. 1g is 30% of 3g.
This is not exact, but it is good enough to learn what the different moisture levels feel like.
I see.
Just for reference, would you say it’s time to start the conditioning for this bean: https://drive.google.com/file/d/1ij9AkECbMesz4AnVABWBD8WH0Uw2bLn9/view?usp=sharing
It has the dried apricot consistence that you say and the color is like a dark brown. Do I have to wait until they are black or they will get darker during the conditioning?
Thanks again.
Looks pretty ready. And the color looks good too. I would not expect it to change much as it conditions. Whether you get the color to black or not depends on several things, but mostly the ripeness of the bean when it’s harvested. A riper bean will give a darker color. As long as it’s not “woody” (light brown) you’re good.
[…] Use a sweat box. A great DIY option for building a sweatbox is provided by Kaua’i’s The Vanillery. […]
Can this be scaled up to say fridge sized, with a water bath which has its temperature controlled by a PID controller, with a small aquarium pump to circulate the water? Is humidity a concern in this process?
Yes, I’m sure it can. I like your fridge idea. This is something I am going to have to figure out in the next few years as we begin to scale up. Humidity is not an issue at all, in fact, with the exception of drying the beans, more humidity is helpful.
Hello, I just picked about 50 beans from a vanilla vine here in New Caledonia. I’m thinking of using my dehydrator to sweat the beans. I have a big dehydrator with temperature settings and I’m going to remove most of the trays and place the beans in sealed containers. That way they won’t be dried by the fans. I would really appreciate your thoughts on this. Thanks.
Hi Annabella, congratulations on your harvest.
Your plan sounds like it will work. I would suggest you don’t skip the “kill” where you place the beans in 150ºF water for 3 minutes. This is necessary to initiate the flavor development. After the first few days, take them out of the containers for an hour of dry time regularly so they don’t begin to ferment or rot. After 2–3 weeks, take them out and dry them as slowly as possible.
Hi Roland,
Greg here in Ft Myers Fl. We survived Ian with very little damage. We brought plants into the patio area. We are helping locals as much as we can with donations.
After pollinating 337 flowers my vines have really done well, not sure just how many beans are on my vines +/- 175 or so. We’re starting to see yellow tips some cracking so I am picking them and freezing for now.
I’m going to make a sweat box, I just ordered all the parts…
How many beans would you be able to put in at one time?
Thanks for all the knowledge and experience to help some of us new growers. My vines were given to me three years ago and did flower two times before I got them…they are my babies now lol.
Sounds like things are going well with your vanilla. There is really only a practical limit to the amount of beans you can sweat: you’ll be able to sweat them all at once (and you should if you can) given that your box is large enough. When we sweat, the beans go into 1‑gallon zipper bags, and each one will have 1–2 lbs. of beans. It helps to keep the beans all going the samw way in the bag, you can get then in and out easier that way, and they will stay nice and straight as they cure.
Hello again Roland Greg here, I just finished the sweat box,it seems to work pretty good on the first test. However the temp is set at 115 but the temp probe is only showing 50.1 or so…I have an inferred thermometer that reads like 116 to 117 or so, and that is with the first placement of the probe down low away from the elements.I taped the probe to the lid of the Igloo Cube and doesn’t seam to change…I thought maybe it is reading in Celsius??When I open the lid and shoot the temp with the inferred gun it is dead on 115.2. Any thoughts? Plus, you do put the beans in sealed bags to sweat them right? This system seams to be working very nicely, and thanks again for the easy to fab up design.
Roland, after checking the controller instructions it say’s it does read in celcius…
Yeah that makes sense…and you did right to check it with other thermometers, always a good idea to cross-check.
The bags the beans are in should be sealed, yes. I use ziplock bags for that. Makes it easy to take them out for the daily trip to the dehydrator. Actually doesn’t have to be every day, but on a regular basis to keep things from rotting.
Hi Roland, Greg here, I have 157 beans to process.I’m switching to a larger cooler. A friend gave me an Igloo Extreme Marine cooler…it’s huge!! My question, since this IS the first large harvest. After all the beans are harvested what kind of pruning or maintenance is best for the vines?? I watered and feed them and will prune soon. Thanks in advance!! Would love to send a few pictures.
Hi Greg,
That’s great, I hope your curing goes well.
Pruning and maintenance is pretty light until (and unless) the plants get very large. We didn’t prune for years because at first, you want to build up as much length on the vines as possible. So this means that the maintenance will mostly be training the vines, keeping them growing where you want them. This has to be done on a regular basis, at least once a month to avoid having to move vines that have firmly established themselves where you don’t want them.
If you’re going for the long haul in increasing your production, you will want to make sure your supports can handle the weight and bulk of the vines as they mature. We really understimated how that would go and ended up having to change our support system several years in because the weight of the vines was breaking our trellises.
Training the vines is essentially letting them run in loops: over the top and then down to the ground, and then up again. This encourages the feeder roots to get established and keeps things compact while you are getting more vine length.
We prune often now, because once you get to a certain point in the growth (like over 5 growing tips on a vine) you want to be careful not to let the new growth shade out the old growth…that will result in decreased flowering.
Pruning is not traumatic to a healthy plant, it will bud out with a new vine just below the cut within several weeks. If the plant is just getting started, however, it’s best to just let it run and build length. If you’ve got pretty vigorous growth and you want to take a cutting, that won’t be a big setback to the plant.
Hello again Roland, the sweating is going good. Most of the beans are soft and pliable however about a third of the harvest may have been picked a bit early but are softening up. My question is should I continue the sweating for the ones that are not as soft as the others?? I massage them everyday between sweat box and dehydrator and has really helped soften them. Thanks again for all your help…the sweat box has done a wonderful job!!
Hi Greg,
The big reason not to harvest early is that the sugar content of the beans will be lower, and since the vanillin comes from the complex sugars in a ripe bean, you’ll get a lower vanillin content in an unripe bean. They will cure up the same, as long as they are not too unripe. If a bean looks dull after the sweat, then it migh be too unripe to be any good. This is because a byproduct of the vanillin development is glucose, which coats the outside of the bean and makes it shiny.
We don’t usually run into this problem, but in practice, we go ahead and cure all the beans and dry them. Then at the end of the process when we’re grading the beans, we take out any beans that have a dull appearance.
You can continue sweating, there’s no harm in it, but it won’t help much if the problem is the bean was too unripe to cure properly.
Hey Roland Greg again, sorry to bother you again but forgot to ask you about removing the racemes after the final harvest?? I think the beans are going to be fine. I hope the plant flowers again this year/soon??
Thanks again,
Greg Trokey
Hi Greg,
We used to leave the racemes on the plant after all the beans have been harvested off of it, but now we cut them off because I found they were vulnerable to insects. I have not seen any evidence that this practice stimulates flowering.
Vanilla normally flowers only once per year. I’ve heard there are practices that can make a vine flower out of season, but I don’t know about that and we wouldn’t do that anyway…it works better for us if all the vines are on the same schedule.
Hi Roland,
I removed racemes and found a few beans that I missed…
We live on a small lake with lots of birds, Squirrels,Iguanas, a Gator or two, also Rats are always near water so I’m going to set up my sweat box as a drying facility with a small fan lightly moving air in the area. Do you think this can work? Other than a fly or a mosquito getting into the house they will be protected from potential pests. Your thoughts on this plan? Thx so much for all your help, I’ve learned a great deal from my friend in Hawaii.
Sounds workable. The important thing about air drying is keeping it away from sources of moisture, so if it is outdoors, it should be as far from the ground as possible, and away from large plants or trees. If it is indoors, that is usually drier than outside. Air movement is critical, so the fan is important. The one thing I’d be careful of is you don’t want the beans to cool down too much during the sweat process, so putting them someplace warm while they are on their dry cycle is a good idea. We use an electric dehydrator for that so everything stays pretty wram, about 115°F, like thw sweat box.
The sweat cycle is completed…18 days. I was going to turn off the heating elements and use the rack inside the cooler with the lid half way open and the fan across the room moving air toward the box…the air movement is light but moving, no heat at this point??
OK, I see…yes, that could work, airflow is really what is getting the drying done, especially in a humid climate, so if you got that happening, you should be good. Be prepared for it to take a long time, 6 or more weeks.
Thanks Roland, I will not forget this.
They seam to be doing good, the house is air conditioned so 0 moisture in this house. I will keep an eye out for them drying out to much as that’s what AC does is take the moisture OUT of the air. I just want to make it thru this time and will be much more at ease on the next year and a half of ” Love for Vanilla” !! lol
Greg Trokey
Hi Roland,
After almost two weeks of drying I’m not sure when and what the next step will be. Some of the smaller beans are drying out and should be removed.Most are getting soft and pliable. What should be the clue that they are ready to store, and do they need to go into vacuum packed packages or??
Thank you,
Greg Trokey
I know it can be difficult to determine when the beans are dry enough. What I look for is a soft but firm feeling inside the bean when I gently squeeze it. If it feels slippery or goopy inside, it’s too wet still. For the usability of the bean it is better to be on the dry side. Also, depends on the size of the bean, small beans should be drier than large beans because they just don’t have has much stuff inside. A too-dry bean is still quite usable for extract, but a too wet bean might go sour. It’s your larger beans that you want to keep soft because these are the ones you’ll want to be able to scrape the caviar out of.
In humid outdoor conditions, it can take up to 10 weeks to fully dry a large bean, and medium size beans will need about 6, so it’s OK that it’s taking a long time. Your conditions will of course be different, indoors is a lot drier, for instance, and it will go quicker there.
As the beans get dry enough, collect them in a plastic bag for conditioning. Conditioning is the aging process we use to finish the beans. We do that for at least 3 months. Once the conditiong is done, the beans are graded. We don’t vacuum pack beans until we are retailing them, and we don’t vacuum-pack for long-term storage, we find it distorts the shape of the beans. Beans that are getting conditioned or stored are in a plastic weather proof tote, this is to prevent off flavors and smells in the environment from tainting the beans.
Thank you very much for this new information. It’s new to me. We Sustainable concepts SARL, a company working closely with an association of small scale farmers in Madagascar and we are looking a new way modern curing process in order to get the best beans this season.
We until now processing our beans the traditionnal way.
Cheers
I’m happy to hear you found the information useful. It was necssary for us to deveop a different way to cure the vanilla because the weather here doesn’t allow us to cure in the sun. It’s not warm enough or sunny enough for that during the harvest season.