
In Part 1, I explained how to harvest and prepare the beans for curing, and what equipment you’ll need. Next, we’ll go through how to sweat, dry and age the beans.
The Sweat Cycle
Following from the previous tutorial, your beans are now in the warm sweat box.
The beans are going to stay in the sweat box for 48 hours at first. Use the thermometer to watch the temperature in the zone where the beans are. The optimal temperature is 115℉, so the closer it stays to that temp, the better. Lower temperatures are OK, but once it gets into the low 90s, refill the water jugs.
This may be the most challenging part of the process to get right, but remember that having it drop into the 80s is not a big deal, it just will slow things down. Do your best to keep the temps up, but don’t worry about it.
The beans will become sticky and wet in the bag. This is what we’re looking for, it’s the sweat.
Once the 48 hours (or so–no need to be exact) is up, we cycle the beans through the dehydrator. Take your beans out of the bag and spread onto your dehydrator shelves. Turn the dehydrator to 115℉ and leave the beans in there for an hour or so. The stickiness should dry some…probably not all the way dry for the first few cycles.
Refill the hot water jugs with hot water.
After the hour of dehydrating, put the beans back into their bag (don’t be tempted to replace, wash or dry the bag, just re-use the wet bag), and then into the sweat box.
While the first sweat cycle is 48 hours, all subsequent sweat cycles will be 24 hours until the sweating is done. Between each cycle is 1 hour in the dehydrator. The effect of this is a very slow drying while the beans are sweating. This is partly to prevent rotting with all that warmth and moisture.
Once you’re into the sweat by a week, it becomes less critical that you do the dry cycle every 24 hours. Skipping a day is not a big deal. The temperature needs to stay near the optimal 115℉ as much as possible the whole time, however.
In our operation here, we use a electrically heated sweat box, much like an incubator, so the temperature control is automatic.
Completing the Sweat
The sweat is going to take 18 days from when you first put the beans into the sweat box. In that time, the color will turn from green to a light greenish brown and finally to brown. The aroma of the beans will go from sharp and floral at first, to a kind of (what I call) “leathery” smell. It won’t so much smell of vanilla until the end of the sweating period.
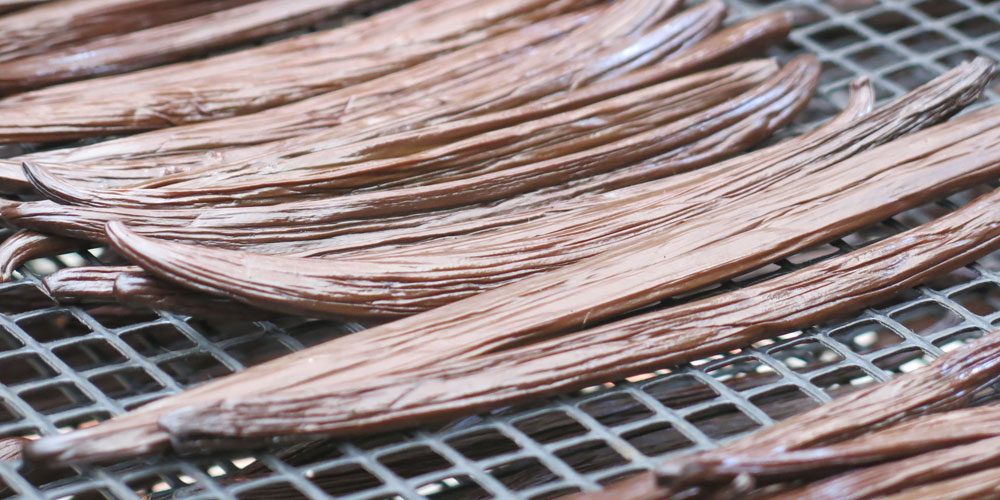
The beans may be a bit oily (the “oil” is really glucose) to the touch at the end of the 18 days, and they will have begun to shrink and get longitudinal wrinkles. These wrinkles are something you are going to focus on when assessing the progress of a bean as it cures.
Drying the Beans
The next stage is slowly drying the beans until they reach the desired moisture level. This can take anywhere from 3 weeks (for smaller beans) to 2 months to complete.
How you do the drying depends on what situation you can arrange for the beans. Here in Hawaii, we dry them outdoors on a drying rack that is elevated (on a roof) and protected from the rain and sun. Depending on your circumstances, there are several ways you can do the drying.
We want to dry the beans very slowly to get the best quality. This allows any remaining vanillin reactions to complete within the bean. It also helps ensure that we don’t overdry the beans. The sweat has conditioned the beans so they are preserved and stable as far as spoilage is concerned, so we are not in a hurry to dry them.
The important considerations for drying vanilla are:
- Clean, dry environment
- Undisturbed for several weeks
- Plenty of air circulation
Here are some ideas for setups for drying the beans:
- Indoors on dehydrator shelves placed on a laundry rack or wire shelf
- Outdoors on a similar setup, but away from the ground or over concrete, such as on a patio. Keep them high off the ground and don’t let the drying beans get wet.
- Solar dehydrator not in the sun, similar location: high off the ground or over concrete, this is to avoid dew, which comes up from the ground.
- Dehydrator with fan on and heat off. Drying will happen much more quickly, watch them closely.
Checking the Beans’ Moisture Level
The drying process will need to continue as long as it takes for each bean to reach the desired moisture level. Each bean will dry at its own rate, so you will need to check on them frequently. Beans that are done are put into a sealed plastic bag.
To check the moisture level, look closely at the wrinkled surface of the bean. While a bean is drying, there will be wrinkles with smooth bean surface between them. As they dry, the width of the smooth surface between the wrinkles gets smaller. A fully-dried bean will have little or no smooth areas between the wrinkles: it will be all wrinkles.
You can feel the dryness as well. This takes some experience to get right, but you can squeeze the bean between your fingers to get a sense of what the moisture level inside is. What I look for is something like what you’d expect a soft dried fruit (such as an apricot) to feel like. As it dries, it will stop feeling slippery inside the bean and instead it will be a little firm yet still supple.
The color is another way to gauge the dryness: it will get darker, usually going from dark brown to almost black. This is not a reliable test, however, as it is normal for the bean color to vary depending on a lot of factors. Your beans may start out light brown and get darker, but only to a dark brown.
If the beans stay light brown, that is a quality issue. They will feel slightly hollow inside and dry on the surface. A bean like this is still usable, but it won’t have the flavor intensity of a good quality bean. The usual reason for this condition is an under-ripened bean.
Conditioning the Beans
Once the beans are dried, the final stage is to age or “condition” them for a while. As explained above, we place the dried beans in a sealed plastic bag once the finish drying. Label the bag with the date of the last bean to go in there.
The beans should condition for at least 3 months after drying. This is where the flavor and aroma settles in and stabilizes. Since the beans are together in a sealed container, the moisture and aroma equalizes, and you end up with a more consistent cure.
After the 3‑month conditioning, the beans are done and can be handled like any vanilla bean. They should be kept in a sealed container and will keep indefinitely that way. This is also when you will select out your beans for making extract.
Extract beans tend to be dryer, so select out all the beans that are firm, and not as supple. Also any small beans or beans that are split more than 1/2 inch. These beans are used to make your extract.
So that’s it, if you’re growing vanilla, you can use this tutorial to cure them for maximum flavor development and best bean condition while preventing mold.
[…] the next part, we get into how to complete the sweating process and how to dry and age the […]
Hi Roland. Thank you for sharing all of the treasures that you know about curing of the vanilla beans. This was my 4th year of giving it a go. I found your instructions and are in the process of going through that. The other 3 failed as the beans were either completely dried out, or went mouldy. So far I have just completed the 18 days of sweating. So far they look and smell amazing. I live new Mackay, Australia, so our climate here can be very humid.
I just wanted to say a big thank you for sharing your knowledge. Desley
Hi Desley, You’re welcome, I’m glad to hear the information has been helpful. So much of what you need to know is gained by experience, so hopefully, it all adds up to resulting in excellent quality vanilla! Best of luck with your vanilla!
hi my name is kym i bought a property in innisfail and i just have over 1000 plants i am panicing on my curing and drying process you sound like you got it i would love to hear from you with any info
My first suggestion is you buy and read The Vanilla Handbook by Piero Banchessi, this is the authoritative guide for small-scale vanilla production. A thousand plants is not exactly small scale, but this book will give you the knowledge you’ll need to go into production with your vanilla. The link I provided will take you to where you can purchase the book, I strongly recommend you do so.
In the short term, I’d suggest you read my articles on curing vanilla if you haven’t already. If you’ve got specific questions, let me know.
Best of luck with your new vanilla farm! I’d love to hear how things go for you!
Roland thank you for this tutorial. It is the best info that I found as a beginner. My vanilla plant started just 18 months before from a cutting of a very mature plant gave me 10 flowers. I managed to get 7 beans to ripen and then had no idea how to cure. I am now to the end of the 18 day sweat and they are looking good! Thanks!
I’m happy to hear it was helpful. Good luck with your cure!
Would this work on my Vanilla tahitensis plant?
I believe it would, although I have never cured Tahitian vanilla, but the principle is the same.
Thank you for this tutorial. I inherited a substantial vine when I purchased my home on th Big Island. I got quite a yield of 250 beans. I am 10 days into the sweating process and the beans are already dark brown. Is this normal? Also I do not have a dehydrator so I have been drying the beans on a wire rack using the dough proofing setting in my oven. I hope that this ok? The temp doesn’t exceed 105 degrees. Thanks again. I am really excited to see how these turn out.
Everything you’re describing there sounds good. The beans will lose their color in the sweat box after 3–4 days, so you’re on track there. Your drying setup sounds good, I don’t recommend using a dehydrator unless the slow air-drying method isn’t practical. It will work, but it risks over-drying the beans. Your setup could have the same issue, although without the moving air, that will slow things down a bit. Keep a close eye on them and you’ll be fine. Over-dried beans are perfectly usable for extract, so if that happens to some of them, it’s no great loss.
Good luck with producing your own vanilla beans!
Thank you for the great tutorial! I was searching for how to cure vanilla beans and came across this one. Pics of ripe beans helped me tremendously since this is the first crop of vanilla beans. A freezer, cooler with jugs of hot water, a dehydrator and best of all clear instructions seems very doable and makes better sense than other sources I read
We only had seven beans to harvest, the pollinating learning curve was quite steep and we wasted so many orchids until we figured it out. I’ll let you know how it turns out. I’m in Florida, zone 10a.
I’m glad to hear from you, Rhonda, please let us know how it all turns out. 7 beans is plenty to start with!
Roland, your tutorial has been great and I link to it often in my gardening groups.
We’ve gone from the first year with seven beans to 17 last year and now 57 beans this year. We have pollination down! We are still using the water jug/cooler set up but are thinking about making the sweat box.
We are growing v. planifolia vines, have a v. pompona that should be flowering within a year or so and FL native V. phaeantha vines new this past year. It’s been a fun and educational journey. Thank you for helping us along the way!
You’re welcome, happy to share my experience. I’d be interested to how how your Pompona vines are doing.
What part of Florida are in?
GREAT tutorial! Easy to understand instructions and I appreciated the photo of what the ripe beans should look like. I live in Pepe’ekeo on the Big Island. I’m just harvesting my first successful crop. I have probably 200 beans. The online tutorials I looked at for pollinating were less than stellar. (It took me YEARS to figure that out) I have 30 plants that are 4 years old. I am thoroughly enjoying this new found hobby.
A hui Hou.
Aloha,
Lynn Lincoln
Hi Lynn, that’s pretty impressive, you’ve got a lot of vanilla growing! I appreciate your comments, hard to tell how well I’ve conveyed the information.
I know what you mean about the pollination, even with all the videos out there, it took us a while to get it. Best of luck with your crop!
[url=https://flic.kr/p/2iizcmM][img]https://live.staticflickr.com/65535/49425614937_0f9e3ca605_c.jpg[/img][/url]
I’m keeping my cooler with the jugs of water between 104–120 degrees and re-heat the water while I have the beans in the dehydrator. I bought a wireless refrigerator thermometer/monitor so I don’t loose heat when checking the temp.
The beans have turned brown and the longitudinal wrinkles are starting to appear. 18 days will be next Friday. I’m leaning towards drying them in the dehydrator. How much quicker will they dry?
I can’t say with much accuracy how fast they will dry in your dehydrator, but you will want to check them every day. Keep it on the lowest possible heat. Smaller beans might take a couple days, large beans could be a week. You’ll just have to monitor them closely and get them out when they are done to avoid over-drying them.
Aloha Roland, mahalo for sharing this information. Can you give more details about your electrically heated sweat box please.
Anna
I could write a whole article on this, explaining how to build it and where to get the parts. Briefly, it is a well-insulated cooler with a couple of solid-state heating elements and an electronic temperature control.
You can do something simpler with a heating pad (commonly available at a drugstore) that has a temperature control and a thermometer. I suggest you test the temperature to get the right setting before putting the beans right on the pad. You’re looking for 115℉
If you’re interested in how to build a sweat box like I use, I’ll write that up, it would be good content.
I use a little cooler. I placed an old electric heating pad with the cover removed, a old folded wet hand towel on the bottom, another towel and my bag of “killed” vanilla beans. The heating pad stays on and the temp is a consistent 115°F. I didn’t understand the importance of sweating last year and my vanilla beans were dry and woody, not fragrant and moist. Lesson learned! Thank you for the great tutorial!
Good luck with your bean curing, Renate!
Would definitely love to hear more about building a sweat box like you use!
Will try thermostat and heating pad in the mean time.
Mahalo for your excellent posts.
Anna
You’re welcome!
Could you use a food dehydrator for a sweat box?
I doubt it…the environment should be warm and moist. Your beans are in plastic bags, but the moving air will still remove moisture from the beans (plastic bags are slightly porous) and dry them too quickly.
With your much appreciated help, Roland, I am nearly through the sweating process and about to dry my first batch of beans. I wasn’t loving the cooler & hot water jug setup, and since the beans are in a sealed plastic bag when they’re not in the dehydrator, I’ve been using my Anova sous vide set up to keep them at a steady 115 degrees. I double bagged them & don’t worry about getting all the air out, just enough to keep them submerged. It seems to be working. Still, I look forward to seeing your sweat box post when it comes out.
I live on Oahu’s east side, and have 13 beans, ranging in size from skinny 4″ to plump 8″. This whole endeavor is a wonderful learning experience and I hope to have 2 vines flowering this year. That would keep me busy!
Mahalo,
Carol
Hi Roland,
Great “How To” information with simple explanations and your responses to Replies answered one of my questions. Thanks for that!
I’m about three weeks out since the end of bloom pollination. Many of the first flowers I pollinated, the beans are already 6″- 8″ long and 1/2″ wide. Is this normal? I pollinated my first bloom just 2 months ago and I’m reading it’s a 9 month long growing process. My problem is a few of the largest beans and a few smaller are browning at the tip and then some are turning a bit yellow. Just this week I collected 8–10 beans that where on the ground (squirrel or heavy rain) and I’m using your process to do something with the beans other than toss them in the garbage. With only 100 beans set I’m afraid I’ll have nothing left after 9 months. I’m a treatment free beekeeper and I was hoping to use the beans to infuse my bees honey this year. I don’t treat with pesticide or fungicide so that leaves me little hope for any harvest if this is a disease problem. I’m about 100 mi north of 27deg. latitude (the sweet spot) in zone 9b in Clearwater, Fl. Any suggestions would be helpful.
Hi Tim,
It is normal for the beans to put on size pretty quickly after pollination. Within a couple of weeks, you’re seeing most of the full size the bean is going to achieve. After that, it changes little for the 9–10 months until it ripens.
If the beans you pollinated this year are turning yellow already, that is not right, those beans are failing and won’t be curable. However, be careful, because it’s normal for the flowering and new beans to be coming in before all of the previous year’s beans have ripened…so there can be some overlap. It may be your yellowing beans are actually last year’s ripening beans…ready to harvest and cure.
If the yellowing beans are indeed this year’s beans, it’s not good, but I’ve never seen anything like that, so I don’t know what the issue is. We grow a lot of plants, so we see a fair amount of things not going right, but I’ve never seen that. If you’ve got an agricultural extension agent you can talk to, that might be a good idea.
If you want to send a photo of the beans you’re concerned about, I will take a look and maybe have some idea what’s going on…[email protected]
I live south of the OP in FL and had the same thing happen last year. I would find slightly yellowed beans that had fallen to the ground, around 30% of the beans we pollinated. The beans falling off happened early in the season, not later on.I haven’t seen any yet this year, but it may be too soon. We finished pollinating The last orchids two weeks ago.
Interesting…is it possible this was due to cold weather?
Aloha Roland,
The vines on my vanilla orchids are turning brown in small sections throughout my greenhouse. All of a sudden there is a 3 inch section that has turned brown and with time it atrophy’s into a dead area area and eventually the rest of the vine dies. This happened once last year but only to one orchid. It was at the end of a row and was being exposed to direct sun at that time and I wrote it off to sunburn. Now it is happening throughout the greenhouse. A couple of weeks ago I had to replace the greenhouse (shade screen) my vanilla orchids are under. They were exposed to direct sun for almost two days. The top leaves got burned, died and shriveled up. Is this what is happening to the vine or could it be something else?
Hi Linda,
From you description, I agree it’s probably not sunburn, which tends to happen in patches on the leaves or just with general yellowing of the exposed parts.
What you’re describing could be necrosis caused by a virus. I’m not really qualified to diagnose, but I’ve seen this before and it’s important you take steps to prevent spreading it around. If you can remove the affected plant or plants, that will help a lot. They should be destroyed or at least disposed of somewhere far from other vanilla plants. Also, cutting tools can transmit it to other vanilla plants, so sterilize your clippers (you can use a bleach solution) after using them to cut affected plants.
Once you’ve removed the affected plants, you’ll need to keep an eye out for more of it appearing.
You can find out more from online resources such as this: pestnet.org
Aloha Roland,
This is just an fyi from my previous letter to you.
I took some of the affected plants to the U of H in Hilo and found out it was a virus, Cymbidium Mosaic Virus, that I accidentally transferred from my ornamental orchids. Live and learn…
I harvested 25 lbs of beans this year. The first three days the heat was too high. About 140 degrees. Have I done irreparable harm to the beans?
Well, that’s too bad, but at least you know what happened.
25 lbs. is pretty good! I doubt the high temp ruined the beans, but you’ll know in a few days as the aroma develops.
Hola Roland, I am at the very beginning stages so I appreciate your insight and everyone’s comments. You mentioned cold weather. In S. Florida we get cold snaps. My vines will be outside under a shade house. Is there something more I should do to keep the vines from “freezing?”
You also mentioned drying the beans outside on your roof to protect it from the sun and rain. Could you can take a picture of your drying rack on the roof? Any chance you can make videos and post them to youtube?
Thank you,
Adela
A fairly easy way to protect the plants from cold is to put up wind barriers so that cold air can’t blow through. It won’t protect them from a serious cold snap, though.
Yes, I need to include a picture of the drying racks, good idea. I am planning to do a video about curing the beans soon.
Roland,
I have noticed some of my vanilla beans starting to turn yellow after only 3–4 months. They haven’t fallen off the raceme and are still attached. Is this a familiar problem, and what can I do about it. Vines are 5 years old, and have been looped back into the ground several times. Beans were pollinated in April.
Hi Charlie,
I have heard of this happening for growers in Florida, I’ve had several growers ask me about this, but I don’t know the reason. I don’t see anything about this in my agricultural manuals, the next logical step would be to contact the Ag extension of the University of Florida to find someone knowledgeable to ask about this specific issue. I haven’t seen anything about it in the published literature on the site.
Hello,
First of all, thank you for the amazing website.
I have a silly question. When you discuss sweating the beans in a 1 gallon bag is the bag sealed or open?
I have my first beans coming in this year on Ohau and don’t want to goof them up.
Thanks
Dominick
Hi Dominick,
I seal the bags, gently pressing out some of the air first. You want the sweat to coat all the beans, so keeping in all the moisture will help with that. After the first two days, they should be pretty sticky in there…that is good, you want that. The stickiness will fade as the curing continues, but the beans will stay a bit oily to the touch. That is a sign things are going well.
–Roland
Hi Roland,
I,m from Malaysia.
Thanks for your wonderful Website.
Normally ‚what is the drying ratio of green Vanilla bean to a cured dry vanilla bean ?
TQVM.
In general, you’re going to get 30% of your green harvest weight in cured beans. So if you harvest 1000Kg, you’ll have about 300Kg of cured beans. This does not take grading into account, once the beans are graded, it will be less…but that really depends on a lot of factors, so it’s hard to say what that will be.
For calculating the moisture content of a vanilla bean, we assume the moisture content of the green bean at 81% which means that a 10g green bean has 8.1g of water, so if it is cured to a 30% moisture content, it will weigh 1.9g (dry weight) + 2.43g (30% of the water) or 4.33g.
Aloha Roland
Trish from Big Island.
I’m waiting for my beans to ripen on the vine.
How yellow should they be for me to pick before freezing?
I have sweat box set up.
Please clarify:
After freezing for at least 24 hours I place beans in the zipped plastic zip lock bags on top of towels .
How many in 1 gal bag?
Can I stack bags?
Mahalo,
Trish
I’m in the same boat in Waialua (oahu). Some beans are kinda yellow, but most are not. I may have to wait for 1 to split before I pick them all.
Yes, definitely let them fully ripen, but you don’t pick them all at once. You pick each one as it ripens.
I’ve got a picture here that shows ripe beans. I wait until the tip is yellow (sometimes is it really just light green) and I can see the little “mouth” where the bean is going to split open. If it starts to split, it’s ready, pick it right away.
The reason I recommend freezing for small harvests is so you can keep putting your harvested beans into the freezer until all the beans are harvested. You can use a gallon ziplock bag for that, and when the bag is full, you can start sweating those beans. So there’s no set time, just keep putting them in the freezer until your ziplock is full or the plants are done and you’ve harvested all your beans. The beans can stay in the freezer as long as you need until you’re ready to sweat them.
The important thing about this is that the sweat will go a lot better if you’re curing at least 1 pound of beans. Sweating a small quantity of beans doesn’t work too well, so the idea is to keep freezing the beans as they are harvested until there is enough to sweat.
We don’t freeze our beans because each day’s harvest is usually more than enough to cure. What we do instead is “scald” the beans in hot water to prep them for sweating. It has a similar effect on starting the enzymatic process, but it’s a lot faster and more practical for a large quantity.
So, on the sweat, yes you can stack the bags. When we are in full swing, we have two coolers full of sweating beans. We put a date on the bag so we know how long each bag of beans has been sweating. We stack them so that the newest beans are on the bottom.
When we cycle the beans through the dehydrator, we are careful to keep each bag of beans separate (the dehydrator shelf is labeled with the date also) so we always know how long each batch has been sweating.
–Roland
Thanks so much for the wonderful information. This is my first year so I only have 9 beans. Can I use my oven if I don’t have a dehydrator?
Probably best not to, really the most important thing in drying the beans it air circulation. So, it would be better to sun dry them in a way that lets plenty of air circulate around the beans.
The sweat is also important, so putting them in a plastic bag in the sun will work for that part, but it needs to stay warm. You’re not going to leave them in the bag all the time, just most of the day, take them out of the bag for a few hours in the hottest part of the day.
Honestly it is very hard to get good results with such a small batch, just do your best. A food dehydrator is pretty much a requirement for good results, I’ve found.
Thanks for this excellent how-to on curing vanilla. I grow my vanilla in a greenhouse in Oregon, and (after having the plant more than 25 years, grown mostly in a sunny window of my house) it started blooming about 4 years ago, after I built the greenhouse and moved it in there, where it grows in quite bright light, right up under the glass along the rafters. In April of 2020, after watching a Youtube video, I was successful at actually pollinating 4 of 5 blooms, which I harvested on January 25, 2021. The “beans” seem quite large compared to what I’ve seen on the internet, the largest 59 grams and the smallest 37 grams. (194 grams total) I harvested them all at once (they were all nearly identical in terms of changing to a distinctly more yellowish color, over the course of only about a week.) I then blanched them in 160F water for 3 minutes. They are in a ziplock bag in the 4th day of the sweat, which is in a Yeti “cooler” with 7 gallons of hot water in jugs, which has been maintaining the temperature between about 105 and 120F, changing at least some of the water once or twice a day to keep the temperature in that range. I’m trying to keep from peeking, which drops the temperature a degree or two each time I look. They have turned to an oily, deep brown and are definitely developing the vanilla scent. So far, so good, and transforming just as you said.
Wow, that’s great, Steve. Thanks for sharing your story. I’d long wondered if growing vanilla in a greenhouse could be successful, and it sounds like you’re doing it!
I would advise you to start slowly drying your beans, they may start to rot if you don’t. I take mine out of the sweat box (and out of their plastic bag) and put them in an electric food dehydrator for an hour each day so they dry out very slowly while sweating. The moisture begins to dry onto the surface of the bean, creating a protective layer.
Thanks for the reply. I have been putting the pods in a food dehydrator at 115F for about an hour each day, starting after 48 hours in the sweat box. At first I was disappointed that they didn’t seem to be drying, then looked back here to realize this isn’t the stage I’m actually trying to dry them. While they look a little less oily at the end of the hour, they aren’t developing the drying creases yet, and are only a gram or two less weight than when I started. I looked at lots of Youtube videos and articles (and an 1898 Britannica Encyclopedia article), and your description is the clearest at explaining just what it is I’m trying to do. Is the 18 day period in the sweat box fixed in stone? Since my seed pods seem so large compared to others I’ve seen, I wonder if they might need more time in the sweat box to complete this part of the curing? My plant was a cutting from an experimental greenhouse at Oregon State University when my niece worked in the greenhouse in 1990. While it was labeled V. planifolia, the leaves are larger and slightly more heart shaped, and the vine thicker than other plants I’ve seen sold as V. planifolia.) Thanks again.
The drying process is quite slow and the creases won’t be seen for a week or so into the process, especially for a large bean. From your description, your beans are indeed quite large, 15–20g is a typical average for a class I green bean.
It is true that large beans could stand to sweat longer. In practice, we don’t do that, it would complicate the curing process too much considering the volumes we deal with. We tend to oversweat the smaller beans as a result. There’s no real drawback to that as far as quality is concerned.
In general, you’re going to get about halfway to the final moisture content in the sweat, then complete the dryng in an open air dryer. In a temperate climate, I’m not sure what that would mean. Outdoors the cold temperatures won’t be helpful, indoors the humidity can be quite low and they will dry more quickly than is desirable. A very large bean would take well over 8 weeks to dry here.
Since you know the starting weight, you can calculate the moisture content of the bean as it dries with the knowledge that the initial moisture content is generally 80%. Your target moisture content for taking it out of the sweat would then be 60% and for finishing the drying process 30%.
As to why your beans are so large, yes, you’ve probably got some good genetics there. Generally, a large plant will produce larger beans if there are fewer on the vine. In cultivation, we are careful not to pollinate too many flowers so that the bean size stays large enough. So, it sounds like you’ve really optimized that principle in your case.
Hi Roland, Thanks so much for this wonderful tutorial! This is my first time harvesting and growing vanilla, and I have 29 beans. All of them were ripe when picked, but some of them I noticed too late and they split and started to brown. Will they take a shorter time to cure? Is it best to separate them?
I just put them in all in the cooler to sweat, but the thermometer seems to be increasing rather slowly, after 20 minutes, it has only reached 89 degrees. I’m starting to think an electric heater would be better, but I was curious if there was a maximum temperature the beans can sweat at? I have a few electric heating devices, but they don’t let me adjust the temperature. Thanks so much!
You can actually go quite high with the temperature, and if you’re not using an electric heater, it’s probably a good idea to use water jugs with water that is hotter than you need…like 120 or 130 degrees F. Some places sweat their beans at 160 degrees, so don’t worry about it getting above the 115 degrees I recommend.
You should not separate the beans in the sweat, put them all together, you want as much bean mass as possible (to a point, of course) in the sweat.
HI, Roland. Back with an update/correction and a question about calculating the moisture content I’m aiming for.
It turns out, I now think my plant was mislabeled, and is actually V. pompona, rather than V. planifolia. Another member of the Oregon Orchid Society consulted with a person he knew more knowledgeable than I (and showing her pictures of my plant and beans) who thought it was actually V. pompona. After some more review of internet pictures, it certainly looks like the thicker stems, leaves and beans are consistent with pompona (beans often looking like small bananas rather than green bean-looking seed pods of V. planifolia. So, would there be a different curing process for the two species? After 15 days of sweating, my beans have only lost about 7 or 8% or their original weight with an hour a day in the food dehydrator at 115F. The characteristic vanilla scent is developing, and some creases indicating drying are appearing, but they aren’t anywhere near approaching 60% moisture content yet. I was thinking I should probably keep the sweat going until I get at least a little closer to the 60% moisture you mentioned aiming for at the end of the sweat.
The second part most likely illustrates my math ignorance, but, assuming 100g or fresh bean, of which ~ 80 g would be moisture, is the 30% moisture I’m aiming for at the end of the drying cycle be relative to the original weight ( that is, 20 g of dried material and 30 g of water) for a final weight of 50 grams, or 30% moisture in the final product (that is, 20 g of “dry weight of the green pod, + 9 grams of moisture in the final dried bean, which would be 30% moisture of the 29 gram final weight? I’ve used 100 grams as an example, so grams would also be equal to percentage. In other words, when I’m done drying would I have 29 g of dried beans or 50 g of dried beans. Or have I gotten this so confused, I don’t have any idea of what I’m talking about.
Anyway, thanks so much for your guidance, This has been really fun, and seems to be working so far. I’d send pictures if I could figure out how to attach them to this reply. I thought I had replied asking these questions a couple of days ago, but apparently didn’t hit the “post” button. Sorry if I did, and this is a duplicate post.
Steve
I don’t have specific knowledge about curing vanilla pompona. I do carry the beans at times, and I have had conversations with the grower about their process, but I don’t know some critical details like how to know when the bean is ripe. The curing process this grower in Peru uses is similar to mine, but it takes longer, as the beans are quite a bit larger, about 3x the weight of planifolia pods. They have a very nice aroma, kindof like vanilla’s rough country cousin.
I wouold suggest you let the sweating process continue past the 18 days, perhaps giving the daily dry cycle a little more time to avoid them rotting. I would not worry too much about how long it takes, as long as they are slowly drying, eveything is going as it should.
Calculating the moisture level is pretty simple once you get how it works. Key to the process is knowing the initial moisture level. For pompona beans, I don’t know what that would be.
How it works is this: at the 80% moisture level (when the bean is first harvested) a bean weighing 25g will have 25 × 0.8 or 20g grams of water and 25 — 20 or 5g dry weight. So, that same bean at 60% moisture level would weigh (20 × 0.6) + 5 grams or 17g. The trick is knowing the dry weight doesn’t change, only the water weight is changing as the bean dries.
I would not suggest applying this to a batch of beans, each bean will dry at its own rate, so the calculation is only accurate for a single bean. Knowing the average moisture level won’t tell you if any one particular bean is done.
We don’t routinely calculate the moisture level like that, not practical with lots of beans, it’s done by feel. We’re looking for soft, but without a “slippery” feeling inside the bean, much like a dried fruit, like a soft dried apricot.
P.S., I see you answered the question about how to calculate the moisture content, that is that I’m aiming for 30% of the dry bean being water, not 30% of the original weight, and assuming the same calculation applies to the 60% target for the end of the sweat phase.
Thanks again.
Steve
Hello Roland,
I’m only a few beans away from completing my harvest this year, so I tried to reread your tutorials to prepare for curing and ran into a problem. Clicking on the Read or Full Article options do nothing. I’ve tried on both Firefox and Safari, without success. Is there a problem at your end?
Mahalo,
Carol
Hi Carol,
Yes, thanks for letting me know there was a problem, I’ve fixed it, you will get the full article when you click on the article on the home page.
Thank you!
Thank you for your very informative post regarding vanilla pods fermentation. Would like to know the preferred variety of vanilla to plant.
I’m no expert on this, generally speaking there are only two types of vanilla that are commercially grown: bourbon (vanilla planifolia) and tahitian (vanilla tahitensis). They both grow in similar conditions, so I would say that the chouce is based on what you plan to do with your vanilla.
If it’s for your own use, I’d suggest you try the two types and decide based on your preference.
If you are planning to sell your vanilla, the decision would depend on your sales outlets: if you’re working with a buyer, they will have a preference. If you’re selling locally or online, the most common type for your region or country would be a good choice because it would be a product that is familiar to your market. Globally, bourbon is by far the most common, but the market for tahitian vanilla is also strong and growing.
Most vanilla growers are obtaining their vanilla cuttings locally, so it will be whatever type is locally available.
Aloha Roland,
This year went better than last year, in part I’m sure because I had a pound of beans instead of 13. And with a new temperature controlled dehydrator, I didn’t over-dehydrate the beans. However, after the final 3 months of curing, my beans still lack the strong vanilla odor they should exude. They are dark brown and pliable, and they smell very pleasant, but more like fresh tobacco and leather than vanilla. With my new beans well on their way to maturity, can you help me troubleshoot the most likely weak point in my curing process? I hope the third time is the charm!
Mahalo,
Carol
Mine too.
Sweated for 20 days at 50 degrees c, with an hour in the dehydrator each day. Then rack dried to proper appearance and pliability. They look great, and vanilla ice cream was good (but used 3 beans). Smell is very mild in a glass jar with about 60 of them in there.
Aloha Carol,
From your description, there’s some chance the beans were harvested early. One of the things you will see if the beans are not fully ripe is a lighter color and not as strong a vanilla scent, leading to the “tobacco” aroma dominating. It’s a good idea to wait to harvest a bean until it’s really ripe, just about to open…you can see the seam where the bean will split at the tip of the bean…that is a good sign to look for.
Also, you don’t mention if you did the sweat…this is very important because it keeps the beans in the warm, moist environment needed for vanillin development before they are dried.
It took us several years to get the curing process to where we were happy with it, it sounds like you’re getting it.
Roland, I did the sweat and then maintained 115 degrees throughout the sweat/dehydrate cycle, and air-dried in a protected outside location before the final 3‑month conditioning. I harvested the beans as tips yellowed, but this time I will be sure I can see the seam. Given the time frames involved, I can really appreciate your perseverance perfecting your curing system. Thank you for sharing it and guiding us through the process as we learn at home. Carol
You’re welcome, I’m happy to share what I’ve learned.
Thanks for sharing this information! I have a doubt, I’m just starting to learn the process. Should the vanilla bag in the sweat box be closed, or should it be left open to absorb moisture?
You want to keep the bag closed to retain the moisture in the beans while sweating. That moisture is mostly glucose, and it is an important part of getting a good cure.
Roland, It is spring in Australia. I have beans on my vine. Should I be fertilizing them now? If so with what please?
Also should I be taking cuttings so I producing flowers?
Thank you so much for your amazing information .
So thank you
Hi Janine,
I don’t fertilize and I haven’t seen much in the agricultural literature about fertilizing vanilla. Unless your plants are doing poorly, I wouldn’t think it necessary. If you were to fertilize, I’d say that foliar feeding is best, since vanilla gets its nutrients out of the air, like most orchids.
As to taking cuttings, I am doing that all year round because of how much growth we are seeing in the vanillery. The plants will start to shade themselves out if I don’t. Whether you need to do that or not really depends on how much growth you have and how mature the plants are. I didn’t need to prune much for the first 4 years.
Pruning to stimulate flowering should be done about a month before you expect the flowers to begin appearing. For us, this is in February, typically about a month after the first beans start to ripen and we have begun harvesting.
When you prune vanilla you are only cutting off vine from the growing tips, usually about 3–4 feet of vine. Normally, you will never prune the mature part of the vine.
Roland -
Thanks for taking the time to write such clear guides! You are one of the best sources of info for us homegrowers, thank you!
What are your thoughts on using a sous vide setup to sweat the beans? I’m tempted to try a batch of vacuum sealed beans in the sous vide for a longer sweat without the alternating dry times, am I setting myself up for failure?
Regards,
— Brian
Hi Brian,
I have never tried anything like that, but such experiments are how we learn new things. The temperature is not high enough to keep microbes from growing, so there is some risk the beans will begin to rot or go sour. Also, there is keeping it all running for many days. We do the sweat for 18 days. If you do decide to go ahead and try it, I would be very interested to hear how it goes.
One thought I had is if you used a ziplock freezer bag (instead of a heat-sealed bag), you could open them up from time to time to see how they are doing or even take them out to dry a little if it seems things are not going well.
Aloha from Oahu,
I really appreciate your sharing your process! I’ve read so many websites and books and have been muddling through for about 5 years, but I really like your method because it’s appropriate for a small scale grower, unlike many of the other resources I’ve found.
I used your description of how to tell a bean is dry enough (like a dried apricot, not slippery), but then I put them into ziplock for the final cure and I’ve been having issues with mold. Not tons, but I check them weekly and I’ve had to take out a few beans with a bit of white mold each time. Do you think this is an error in my sweating or in my drying stages? Any tips?
Thanks in advance!
Yes, we’ve had problems with white mold in the past, and it does happen occasionally now. As you have suggested, it’s really getting a good sweat on the beans that prevents mold most effectively.
If you’re getting a good sheen on the beans, they will keep and not mold. You’ll know you’re on the right track with that if in the first couple of days in the sweat, the beans have gotten a bit goopy in their plastic bag. The goop is mostly glucose and when you cycle the beans through the dehydrator, this dries onto the bean creating a protective coating.
Getting a good sweat critically depends on a good volume of beans in the bag, should be at least 16 oz. of green beans per bag, 32 oz. is about perfect.
However, even with a good sweat, you can get white mold. You’ll probably see that this happens on beans that were split, the split part of the bean will sometimes have a dull appearance, and that can end up getting moldy. Also, if a bean is dull after sweating and drying, it has a tendency to mold. This can happen if the bean was harvested before it was fully ripe.
The good news is that the white, fluffy mold doesn’t affect the flavor of the bean. When we encounter it, we cut that part of the bean off and discard it. The rest of the bean will be fine for making extract.
thanks Roland for the detailed explanations. I have just bought cured beans from PNG and was wondering if I need to dry them to use them or if I can use them as they are? (they are black and wrinkled but soft with smooth parts in between the wrinkles).
Thanks!
They will be ready to use. They need to be completely cured in order to be shipped, otherwise they might spoil. Properly cured beans will have some softness to them still.
First harvest was last year, we had 72 beans; this year almost 300! Curing goes just fine the way you have outlined the process — and thank you very much! I’m in Costa Rica on the south Pacific Coast at about 1800 feet asl. Last year as the orchids began to bloom, we had an invasion of ants. They ate through the base of the flower bracts and we lost many before they bloomed, and some after. There were a LOT of ants! We have about 20 plants draped over porro trees that take well to coppicing, so we can keep them low to the ground. These trees also are nitrogen fixing trees. Do you fertilize at all? Do you have any ant suggestions? (Not for the ants, for me!) I have also read that to freeze beans prior to starting the during process, they should be frozen at ‑70 C, something I can’t achieve. So the next question is: How long have you successfully frozen them prior to starting the cure? Next year we expect more, so either I need to buy more dehydrators, or do this cure in two batches; perhaps more. (We had one plant this year with 60 beans.…)
That’s an amazing report, Dennis. I’ve never heard of this issue with ants and that’s rough, ants are very difficult to control. My go to for ants is to try to get them to eat bait (with 0.5 to 1% borax) and destroy the colony, but that can be difficult if the ants have multiple food sources. We also depend a lot on liquid peppermint soap (Dr. Bronner’s) for insect control, a small amount in water sprayed on the plants is very discouraging to all insects…you have to do it almost every day until they give up. Next flowering season, I’d suggest you do something like that right from the start of bud formation (assuming this is when they begin to show up), they’re more likely to move to other food sources if they can’t get established.
For the vanilla curing, you could be ready to move to the next stage. The freezing method works good for small number of vanilla vines because it gives you a way to combine several small harvests into a batch large enough to cure. If you’ve got enough beans coming in per harvest (like 500g or more), you can use the hot water scald method. The freshly harvested beans are placed in 150°F (65°C) water for only 3 minutes. This preps the beans for sweating: they are drained and go into a plastic bag and into the sweat box, and from there the process is the same. This yields a better quality cure, and is the method we use here.
If you are freezing, you can keep them frozen for maybe 3 months, I would recommend they be processed as soon as all the beans are harvested. I had a friend give me some beans to cure that had been frozen for over 6 months, and they were difficult to cure properly and the quality ended up being OK, but not great. I have never heard of deep freezing, and it’s not clear to me how that would be preferable, although it’s worth noting that not freezng them hard enough (or letting the temp go above freezing at any time) wouldn’t be good.
A middle ground on this for you would be to do 3–4 harvests into the freezer, then process those as a batch…this will avoid you needing to expand your sweating and dehydrating capacity. You’ll end up doing several batches, but they will be successive, and not all in the sweating process at the same time.
Loved hearing your success story, I’d love to hear how the curing process went once they’re done.
Roland, I understand that freezing the beans, albeit an easy way to batch process, leads to much lower vanillin bean content than blanching. Do you concur?
I don’t know what the numbers on that are, but subjectively it’s only somewhat true. I’ve cured a lot of beans that have been frozen and they are good for personal use, and have plenty of fragrance. It’s a tradeoff, because you’ll also not get the optimal cure if you try to cure too small a quantity of fresh beans.
Roland, thank you so much for your very informative website. I grew my vanilla bean vine from a little sprout I bought at Disney Epcot, it was barely an inch tall! It has now been 7 years and my vine is amazing and finally started to flower. After the stress of learning how to pollinate my orchids, I have 74 beans my 1st season. I am into my 2nd week of sweating using your hot water jug process, so far so good.
My question is about the use of a heating pad. Do you put the beans directly on the pad or to the side like the setup is for using the gallon jugs.
Thank you from Cocoa Beach, Florida.
Hi Kem,
Great news with your vanilla plants maturing and getting a good harvest!
How you need to deal with the heating pad really depends on how the pad works. If the surface of the pad doesn’t ever get above 120ºF you don’t need to worry about the beans being in contact with it. This will depend on how the pad is designed to do its heating cyclces (slow and steady or bursts of high heat, for example) If the pad is too hot during its heating cycle, put a folded towel on the pad under the vanilla beans. Keep an eye on the temp in your box and the beans. You’ll know things are going well if the beans get kindof gooey in their bag.
Hi Roland,
Sweating is going on well. I have completed 8 days of sweat. I wanted to post pictures of beans for you to check if things are progressing well. Any email ID where I can post pictures for a check,
Regards,
Sure, I’m happy to take a look at it. What you should be seeing is some moisture in the bag, it will be slightly thick and gooey. The daily dry cycle should be coating the beans with the glucose and they should be shiny in appearance. The smell at that stage should be a bit like vanilla, but it will be earthier, something like wet leather or tobacco.
You’ll want to keep going with the sweat for another 10 days.
If you want to send pictures, my email is [email protected]
Hi
Thank you for that helpful tutorial. I live in FNQ Australia and harvested about a kg of beans from my vines. Previous years my vanilla curing was very much hit and miss. This year I followed all your steps and have now arrived at, where the beans are conditioned. What temperature should they be kept in for that?
regards Nadine
Hi Nadine, congrats on your success with the curing!
So, for conditioning, we store the beans in gallon-size plastic bags in a weather-tight container. This is kept in the house in a dark place, and we don’t use air conditioning, so it will be humid and warm much of the time. The container helps keep the humidity steady by not allowing outside air in, this is important since even thick plastic bags are slightly permeable to air. You don’t want them drying out at all.
If properly cured, mold will not be a problem, but I suggest you inspect the vanilla at least once a month to make sure nothing is growing in there.
Hiya, my Pompona beans are showing mold 14 days into the sweat…what should I do? My cooler sweat box isn’t getting above 108°, do I need to add more heat? I am worried that I may lose these beans, as of this morning I washed them really good and they are on the 1 hour dry
Hi Robin,
I don’t have any experience curing pompona, so I can only guess what the issue is. The lower temp in your box is probably not the problem, it may be there is too much moisture, but I don’t know.
With planifolia beans, it’s the glucose (the “sweat”) that protects the beans from mold, but there needs to be a balance in the amount of mosture while sweating. This is what the short drying periods are for. If the beans are really wet, you can lengthen that drying time. If they are not wet, skip it.
14 days is probably enough, so you may want to move to drying the beans. Try to do this slowly, open air with good ventilation is best.
aloha, my second curing (about 3 #s over here south of Hilo. finally resorted to using my glass kiln for sweating and that’s working fine.
issue ? is: i discovered the heater in my dehydrator was not working, so have been fan drying at ambient temps around 82. half way through now. i’ve tried a hot bulb shining on the fan but…
is the batch doomed? only about a half dozen still kinda yellow. rest look great.
thanks for your availability. it’s been
soo important,
mahalo
For what it’s worth, I use a cheapo heating pad from amazon, (get one with no safety features so it stays on until you turn it off).
I put that in a small igloo cooler, dishtowel over it and beans in the 1 gallon ziplock lying on the pad.
Flip once a day (as they get hotter on one side than the other). Stays about 120 degrees. Then pull out daily to dry on a towel in the sun or dehydrator if the weather is cloudy.
Sounds like you got a pretty good setup, I think the temp is OK, but you can put a towel or something on top of the pad to cool it down some. Actually, elevating the beans off of the heating pad will help even out the heat because they will be getting warmed by the circulating air, rather than by direct contact with the pad.
Thanks Roland,
Any info and ideas came from your hard work. After about 5 years of harvesting anywhere from 100 to 200 beans a year I’ve found some equilibrium here in Waialua Oahu.
The heating pad is a nice choice for folks with just a bag or 2 of beans.
Sounds like you got it dialed in, are you happy with the quality of your finished beans?
No, the low temps would not have ruined it, it is just better and faster to do the sweat at a higher temp. The color will probably change more slowly, but keep up with it, you’ll know if it worked or not, but it takes time to get there.